
Why not add an overhead
108. August 2013 by Peter
Just spotted an error: All gauges are too big. They should only be 5cm wide.
I have drawn the overhead in Adobe Illustrator. I provide you with both the .ai-fild and pdf here. If you have Illustrator this gives you the option to edit the file before you print it. Otherwise use the pdf-file
Download the Illustrator-file here: Dropbox-link.
Download the pdf-file here: Dropbox-link.
Curent version 1.3
I added one more thing onto the list of unfinished projects: I have begun on the overhead.
The reason – I think – was because there is an add-on to Prosim737 that can play various soundclips depending on the status of the aircraft/flight (Like play a “This is your captain. Welcome on this flight to Munich. Bla bla…” after you enter EDDM as destination on the FMC.) And so I needed an overhead to trigger actions like APU start and engine start.
As the cockpit is on a budget for the time being (My wife has started her own company so income is a bit low these months) I can not afford the €500 for the complete pedestal from ProSimParts. And so I have found a cheaper alternative: A sticker!
So, my plan was to draw the entire overhead panel and print it on to a huge sticker and then stick/glue it on to a piece of plexiglass or Foamalux.
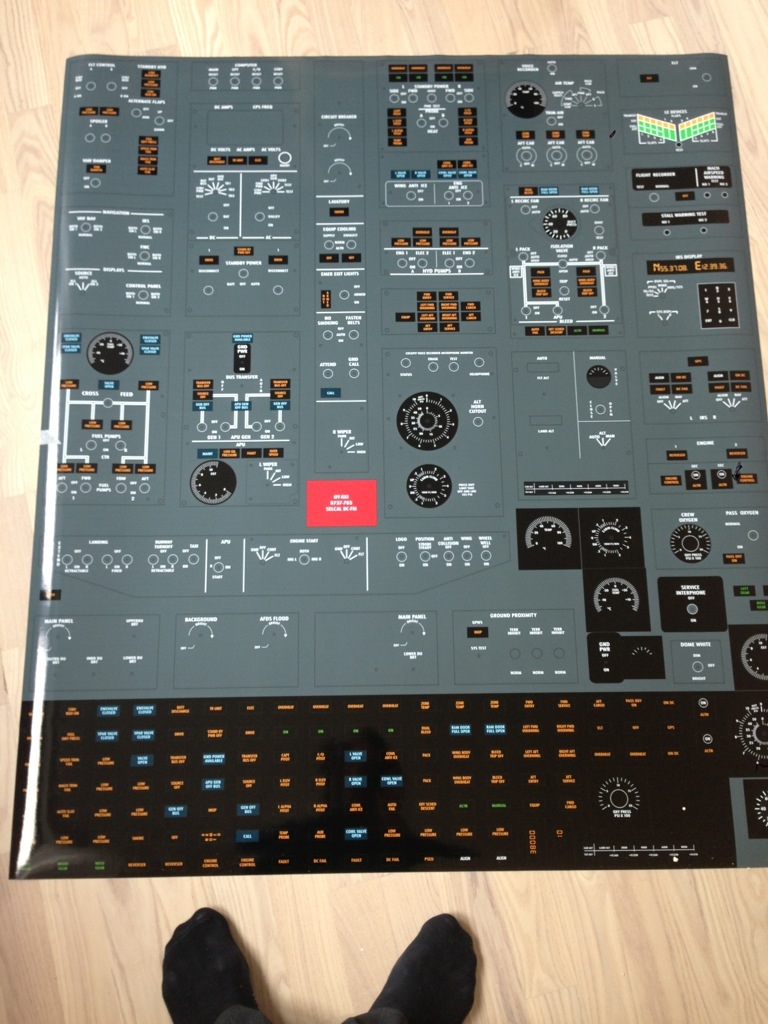
Large sticker (and my feet)
So I started drawing the overhead panel in Illustrator some months ago. My first plan was to make a single sticker sized 65×67 cm (or whatever the size of the FWD overhead is) but then I started thinking. Instead of all panels on a single sticker I should make each panel as a single sticker. So I gave each panel/part of the overhead a margin/bleed of 1 cm on each side. Furthermore I also made extra versions of all gauges and annunciators. More on that later. I ended up with a document that measured aprox. 95×115 cm.
I had a small company in Copenhagen print it on one single large/huge sticker. That only stood me in €35. A fair deal in my eyes.
It arrived today.
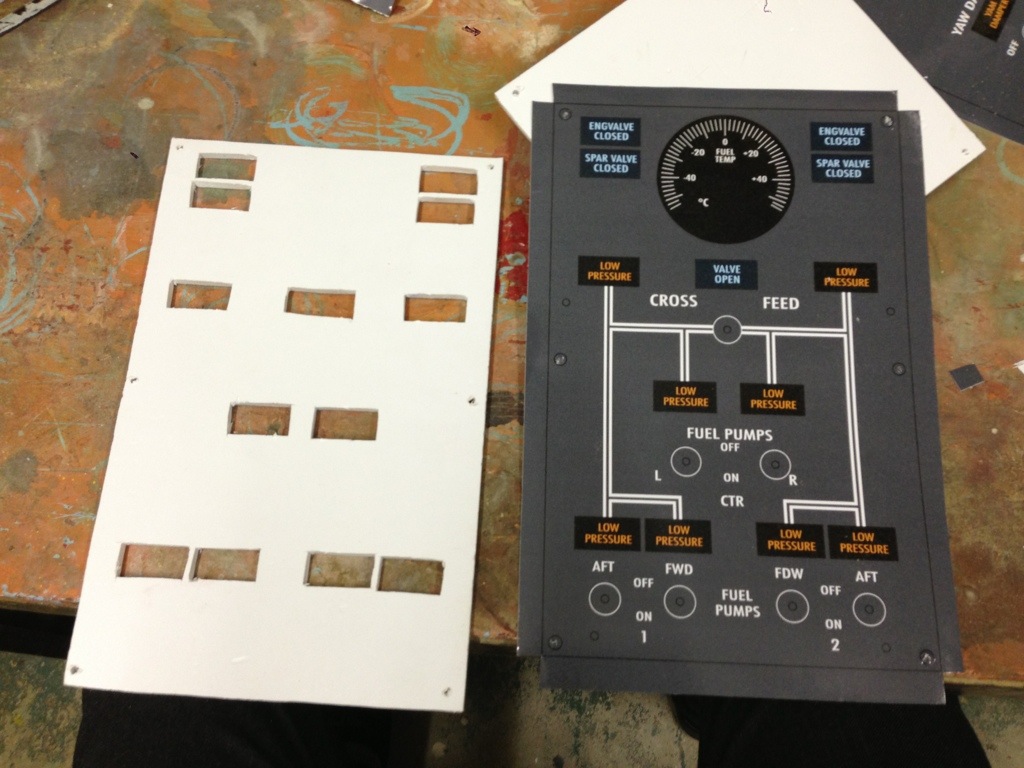
Sticker and Foamalux
So each panel must be cut out from the sticker. I then use 5mm Foamalux as back plate. As I have mentioned before Foamalux is just so much easier to work with than plexiglass. As the sticker-solution not is fit for back lightning I went with Foamalux. The good thing about Foamalux is that it is so easy to cut holes for annunciators. All you need is a sharp knife. The picture to the right shows the cutout sticker and the Foamalux-plate with holes for annunciators later on.
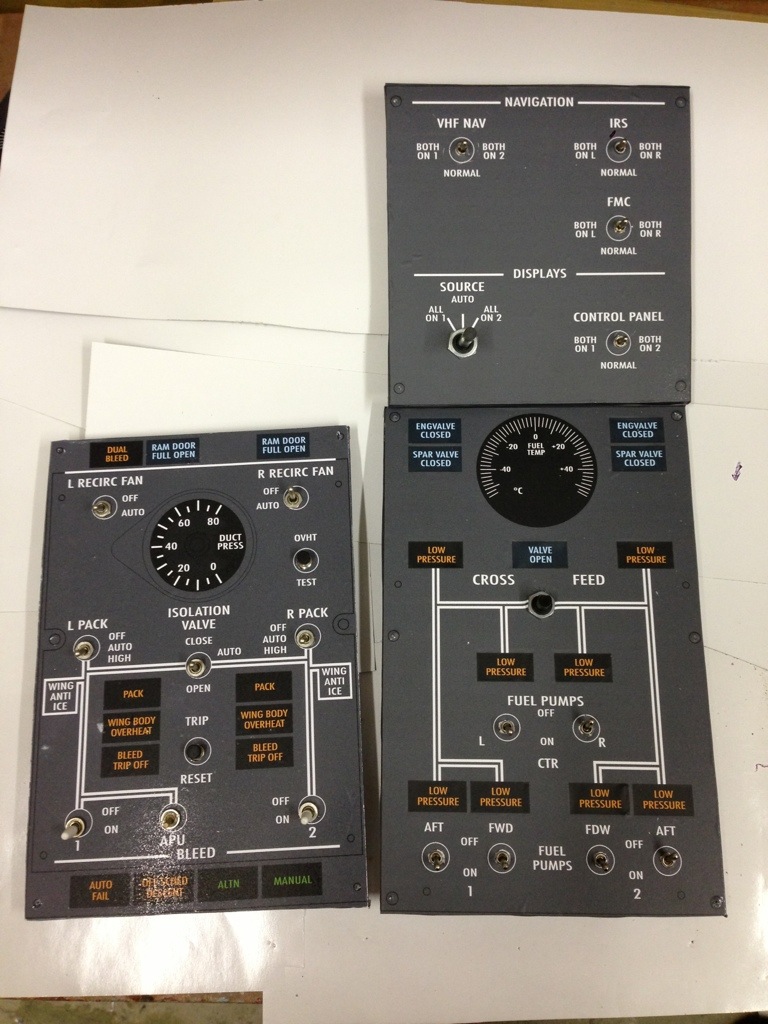
First overhead panels
Putting the two things is a bit tricky as all corners must meet and you also must ensure that no air is trapped under the sticker. That will leave bubbles.
I learned that the hard way after the first panel, the Air panel (to the left on the picture). There are a few small bubbles and I drilled the holes in the backplate before mounting it which resulted in all switches being 2 mm offset. It shows.
But apart from that is was very easy. Cut the Foamalux to measure. Apply the sticker, carefully drill holes for the switches and finally glue them (the switches) on the back.
It is an good idea to glue the switches so you don’t need the washer on the panels frontside.
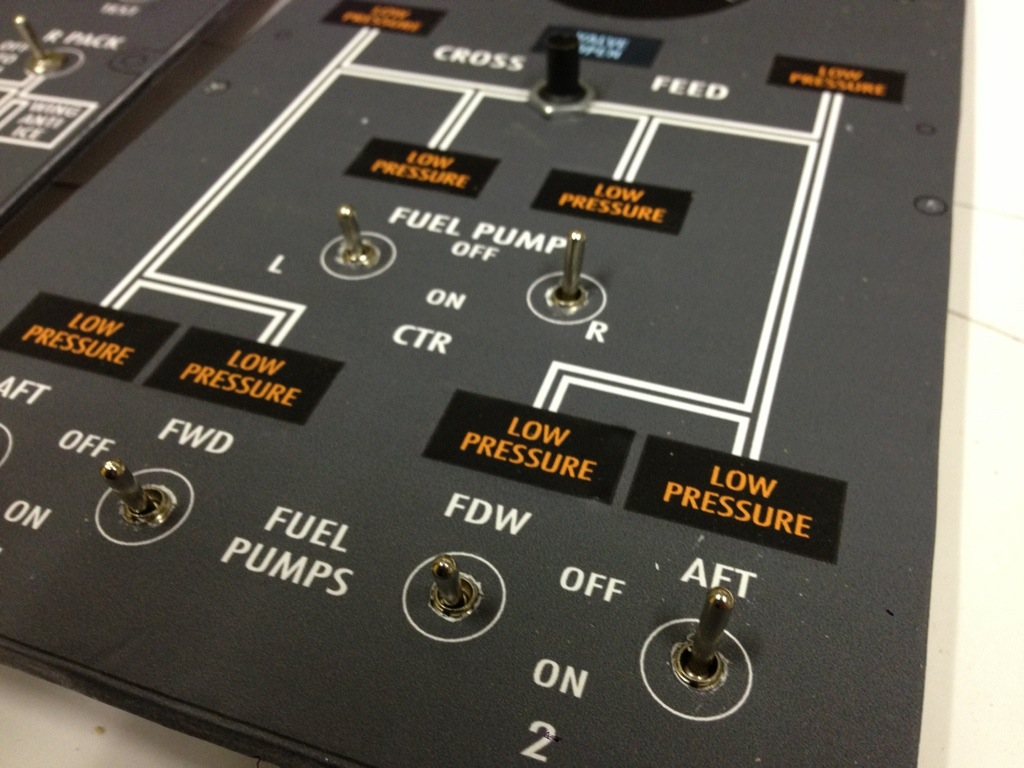
Close up of the fuel panel
Overall I am pretty happy with my solution. It is cheap and quick. But as you can see from the picture, it is just a sticker. So when you cut holes for the switches the plastic might get just a millimeter to wide or to short or tear a bit and that is clearly visible. So one must be very carefull.
Before I mounted the switched I cave eash panel 3-4 layers of matt finish / varnish. The sticker it self is glossy but the matt finish gives it a nice look and hopefully also helps protect it a bit.
And here is a small trick if you want to try this you self. Bend the sticker around the corners just after you have sprayed the finish/varnish on. That softens the plastic and so it is much easier to make a sharp bend.
Regarding the gauges and annunciators My plan is to use the extra gauge on my print as backplate and then cut away the annunciator that is on the panel right now. This will also give some depth to the gauge. And as gauges is very easy to set up in Prosim I might do a few of them.
The annunciators on the panel I also plan to cut out. Then I will cut plexiglass in 0.5 x 1 inch (Size of an annunciator) and wrap the extra annunciator-sticker around the plexiglass and then fit it over the hole and glue it from the back side. Hopefully that will create the illusion of mounted annunciators. Only problem is that I not am looking forward to cutting out 120 small pieces of plexiglass…

WOW, can’t wait for more.
[…] You can download the Illustrator-file via the link in this posting. […]
What a super idea! I am following this with great interest.
Great work and thanks for your efforts in putting the Overhead Graphic together
Kieran
Any idea when the new version with the correct sizes of the annunciators is ready? Because for me this is the perfect solution but I would like to wait for that version before I have it printed on sticker material.
Regards,
Tim
Hi Tim (and everyone else that have asked).
I am quite busy these weeks. But I will try and get it done with in a few weeks. I can not promise to do it faster than that.
Peter
Hi Peter, I have just found your site and am finding it really useful. Thank you for taking the trouble to make all this info available. I am just a beginner and am looking for ways of doing things on my limited budget so thanks again and best wishes to you.
Dallas, (Blue mountains NSW Australia)
Do you happen to have a list of the different switches and LEDs needed – SPST, SPDT, 4 pos rotary, etc?
I just sent my copy off to print, about 40 USD for 26 pound paper, laminated. Nice work!
Hi Joe.
I know there is a list on Hispapanels. But good idea to add the list to the overhead-page. I’ll do that later.
Cheers
Peter
Hey, just a small question. I’m really interested in doing a backlit version, I originally was going to the panels with plexiglass and have die-cut white stickers on there for the text, spray paint them, then remove the stickers. This would leave the plexiglass to light up as a backlight. But trying to size it all and actually work with it will be such a pain.
Aside from Foamalux, Would you have any ideas, (other than cut steel) how I would be able to work with a backlight and the text/labels?
Cheers,
Daniel
Hi Daniel.
I had a talk with another builder some months ago. He suggested printing on transparent foil. This would make all white markings transparent. Then attach it to white perspex (Like the material the panels you buy is made from).
This would allow the white acrylic to be lit but (hopefully) the grey print would block the light. You need to get the thickness of both perspex and foil right as well, but it should be possible I guess.
Cheers
Peter