
180 DEG FOV: Part 2: Calibrating projectors
130. August 2017 by Peter
After making a structure for my 180 degree Field of View and making calculations for the mounting of projectors I started making holes in the ceiling. My wife has been a bit worried about the ceiling as it is a nice looking wooden ceiling.
My idea for mounting the projectors actually ment that I only had to make four (relatively small) holes (4 mm each). On a spacer/piece of wood I have placed two rails across the room. Because I use a spacer I am able to lay two pieces of wood /bars on top of the rails. Each projector is mounted on to these two bars. The bars are not fastened so they can be moved around freely until you get the perfect picture.
Luckly for me – because my calculations were useless.
It is hard to explain and even harder to draw in 2D. But see if you can follow me on this: All projector calculators uses a flat screen. And that is okay of you use a short throw projector. But not when using an ultra short throw.
A short throw projector beams the top part of the picture horizontally and the lower part downwards.
Where as an Ultra short throw projector beams all of the picture downwards including the top part.
This is not a problem for a flat screen. But when using a curved screen the picture will become shaped like half a cylinder because there is a difference in throwing distance varies from the sides to the middle of the screen.
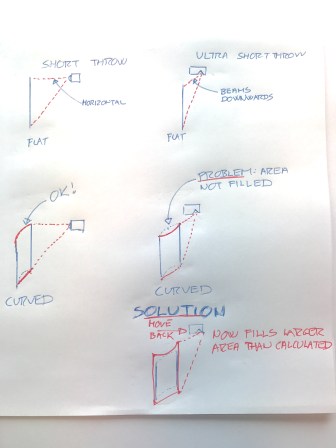
The cylindric image is not a problem when the picture is beamed horizontally. But when beamed at an angle it forms problems. And as a ultra short throw beams the entire image at an angle there will be a part of the upper screen that will be blank.
So you can not use any calculations but just have to go trail’n’error.
I ended ud moving the projectors from 44 cm distance to more than a meter away fo get the entire screen filled out. This will of course have an impact on image quality. But I will find out about that once I get the projectors installed. For now I am just happy that they are mounted.

Hi Peter thanks for these fascinating posts, I hope you continue to post even when your up & away with maybe some tutorial flights and other stuff. Wishing you well, Ian
From: Build a Boeing To: winkletonpeck@yahoo.co.uk Sent: Thursday, 31 August 2017, 12:09 Subject: [New post] 180 DEG FOV: Part 2: Calibrating projectors #yiv1916088610 a:hover {color:red;}#yiv1916088610 a {text-decoration:none;color:#0088cc;}#yiv1916088610 a.yiv1916088610primaryactionlink:link, #yiv1916088610 a.yiv1916088610primaryactionlink:visited {background-color:#2585B2;color:#fff;}#yiv1916088610 a.yiv1916088610primaryactionlink:hover, #yiv1916088610 a.yiv1916088610primaryactionlink:active {background-color:#11729E;color:#fff;}#yiv1916088610 WordPress.com | Peter posted: “After making a structure for my 180 degree Field of View and making calculations for the mounting of projectors I started making holes in the ceiling. My wife has been a bit worried about the ceiling as it is a nice looking wooden ceiling.My idea for mo” | |